Tuesday, January 29, 2013

Tutu Tutorial (Part 2): No Sew Tutu using Crochet Elastic Ribbon

Again for this type of tutu I have used the same knotting method as you would make a No Sew Tulle Tutu - but instead of using any type of elastic or ribbon as a waist band you use crocheted elastic.


You will need:
- some crochet elastic ribbon or a pre-made crochet headband
- strips of tulle or some other fabric
- ribbon or other optional decorations

1) Cut and secure your waist band. 
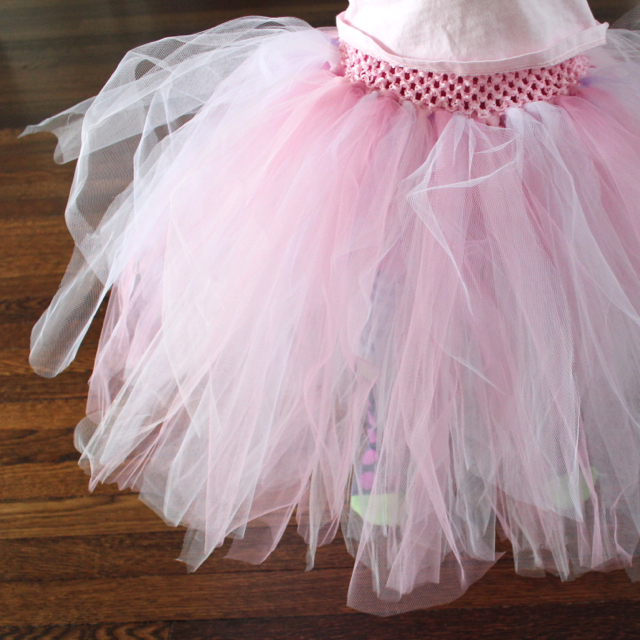
I used 2 1/4 inch crocheted elastic cut from a spool for this project - but you can buy pre-made crochet headbands at most drug stores. This stuff is VERY stretchy - you need to make your waist band much smaller than you think e.g. I made my waist band about 6" smaller than I needed.


I roughly tied the elastic together with a scrap piece of tulle before I started knotting. Once the tutu was finished I braided the join with satin ribbon and tied a bow. 

2) Cut your strips of Tulle
I chose to buy bolts of tulle and I cut them into 6 inch strips with my rotary cutter. This was much cheaper than using tulle ribbon on spools  and it was very quick to cut it this way.


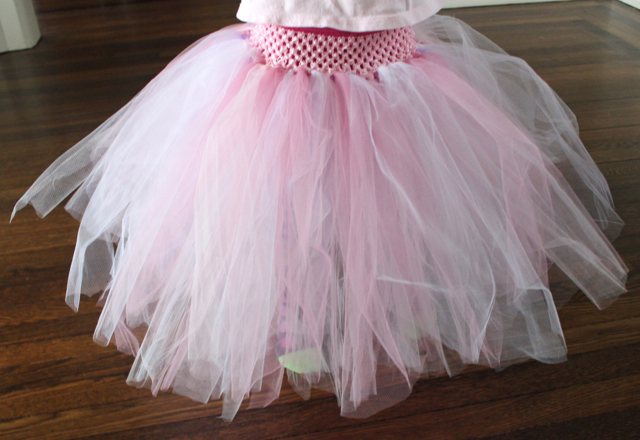
You need to cut your strips twice as long as you want your tutu to be. I cut 26" strips for this tutu. Each round took approx 40+ strips. I knotted 2 rounds of tulle strips - so estimate you will need approx 55-60 yards of 6" tulle for this project. The finished tutu is extremely full. I have seen some tutu's made this way just using one round of knots - so this could be an option for you too.

3) Tie your knots into the elastic


Wrap the elastic band around something big (I used a sofa cushion) and start knotting. I started to tie my knots into the second row of the crocheted elastic. Use one strip of tulle for each knot.


Continue tying knots until you have completed the first round. Start tying knots for your 2nd round - each knot will sit between the knots on the row below. I think 2 rounds of knotted tulle yields better results that just one round - you could do more rounds - but the fluffiness does get a little out of control!


4) Fuss, Fiddle & Enjoy
The more you separate the strips and tulle and fuss with the tulle - the fluffier your tutu will be.


Previous Tutu Tutorial: No Sew Tulle Tutu

Stay tuned for my next posts:
- Recycled Plastic Bag Tutu
- Tutu using Fabric scraps
- Basic Sewn Tutu

Tuesday, January 22, 2013

Tutu Tutorial (Part 1): No Sew Tulle Tutu

I ordered too much tulle for decorating Baby Bunny#1's birthday - and as she and her sister just love to play dress up and dance I decided on embarking on making some tutu's. I couldn't find any tutorials for a sewn tutu - lots of other tutorials for no sew tutu's. My next four (possibly five) posts will be all about different ways to make tutu's - I hope not to bore you or reinvent the wheel! And I really hope my notes on tutu making will help you make your own.


Knotted Tulle Tutu
Here are some great tutorials that will give you a tutu with similar results:
Paige and Brooke Tutu Tutorial
Treasures for Tots Tutu Tutorial - a piece of ribbon is used instead of elastic
Ribbon Treat Tutu Tutorial - this lady uses a different knot to encourage tulle to go in more directions and therefore give you extra fluff

You will need:
- Elastic
- Strips of 6" tulle

1) Cut and secure your waist band. 
I used a 1" no fold elastic - which is quite sturdy stuff so I sewed the two ends together (does that mean I cheated on this no-sew tutu?). If you chose a thinner elastic or a ribbon you could just knot it. If you are using elastic you will want to make your waist band about 8% smaller than the persons waist. Here is a chart to help you.

Waist (inches) Elastic (inches)
15 13 3/4
23 21 1/4
16 14 3/4
24 22   
17 15 3/4
25 23   
18 16 1/2
26 24   
19 17 1/2
27 24 3/4
20 18 1/2
28 25 3/4
21 19 1/4
29 26 3/4
22 20 1/4
30 27 1/2

2) Cut your strips of Tulle
I chose to buy bolts of tulle and I cut them into 6 inch strips with my rotary cutter. This was much cheaper than using tulle ribbon on spools  and it was very quick to cut it this way.


I used 3 strips of 6 inch tulle for one knot - this gave the tutu's great volume. You need to cut your strips twice as long as you want your tutu to be (e.g. 22" strips will yield a 11" long tutu). I used 36+ knots for this tutu. (Which means I used 66 yards of 6" tulle strips for this tutu.) I wrapped the same cutting board I used to make my tulle pom poms to make strips for the tutu. 


I cut the strips at an angle at the bottom of the board only. The angles at the end of the tulle give the tutu a lighter more flouncy feel. Don't worry about the strips being slightly different lengths. The different lengths will also help to give the tutu more volume.

3) Tie your knots

I used the first knotting technique shown above to knot my strips of tulle around the elastic. The second knotting technique is used in Ribbon Treat's Tutu Tutorial. Continue knotting until you think you have no more room.


Once you think you have no room left - wiggle and tighten the knots a little - try and squeeze in some more strips. You really want to pack them in as tight as possible.


4) Fuss, Fiddle & Enjoy
The more you separate the strips and tulle and fuss with the tulle - the fluffier your tutu will be.


You can tie ribbon/bows, stick on pom poms, sew on flowers etc - the options are endless.


Stay tuned for my next posts:
- Recycled Plastic Bag Tutu
- Tulle Tutu (using Crochet Elastic)
- Tutu using Fabric scraps
- Basic Sewn Tutu

Thursday, January 17, 2013

Tutorial: Tulle Pom Poms

We are planning a birthday party in the near future for Baby Bunny#1 - she turns 4 - I can't believe 4 years have gone by so quickly. We are having a Princess Tea Party for her - we (although it sometimes feels like she is) planning a very princess and pink affair!

For decorations I decided to invest in some tulle. I found it very reasonably priced at the Tulle Shop.

There are lots of tutorials out there for making pom poms from tulle. This is my favorite from Nashville Wraps on You Tube - but I prefer to use ribbon to tie my pom poms as tulle rips when it is tied very tightly. (I'm that weird person who goes around collecting all the ribbon after Christmas - wrapping it up carefully waiting to find a second use for it - this is the perfect 2nd use for it.)


You can use 6" pre-cut tulle ribbon - though I cut a 54" bolt of tulle into 6" strips. I didn't take the tulle off the bolt I just cut the tulle and cardboard right the way through with my rotary cutter. It was very quick. The tulle strips do not have to be perfect for pom poms.


You will need:
- Tulle - (I used approx 30 yards of 6" wide tulle)
- Ribbon or something else strong for tying and hanging
- Scissors
- Something stiff-ish to wrap around - cardboard or a book would do the job too.

1) Wrap the tulle around your chosen object 50 times. I used an old cutting board (11" long) to use for my pom poms.


2) Tie ribbon at the center point on one side.


3) Take the tulle off and tie the other side securely - you should have a big puffy looking bow tie shape.


4) Cut through all the loops as evenly as possible. Trim so all the lengths are approximately the same. Again - precision is not needed.


5) Puff and fiddle with the tulle. The more you fiddle and fluff - the fuller and fluffier your pom poms will be.

Hang your tulle pom poms and enjoy! #1 Bunny has already demanded some for her bedroom too.


NOTE: Your pom poms will crush easily - store them carefully if you want to be able to protect their beauty and use them again and again.